Thursday, May 27, 2010

Focal Point - Oversize Art

I recently came across pictures of this living room on Apartment Therapy and fell in love with the large photograph over the couch:

Artwork Inspiration
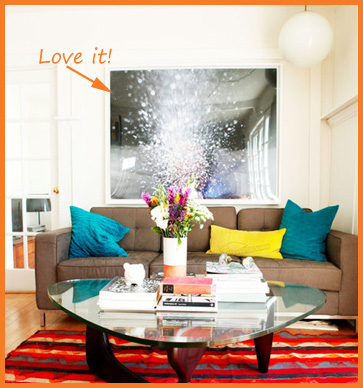
Pictures from "Genevieve and Maxwell's Mid Century Perch" House Tour on
Apartment Therapy

I think I may steal this idea for a wall in our kitchen/ dining area... currently some artwork that I painted is hung there, but don't really love it and have been trying to decide the right replacement. I can't afford a professional piece of art like shown above (House Tour comments indicate the photo is by Kelly Barrie), but this would be great (and even more meaningful!) to implement with a personal photo.

I think what would keep the same feel is to do something abstract. It could be fun to shake up a champagne bottle and see what shots you get out of it. Last summer a friend's wedding had sparklers as the bride and groom exited and they looked great in pictures - a close-up of the sparks would also make for a really neat shot.
Artwork Inspiration
To really make an impact, a key factor here is size - you need the photo to be big! I have used PerfectPosters in the past and was happy with the result (glossy, photo-paper finish), but the print would also be great on a canvas like this. Or, try out The Rasterbator (more info here) for a print-at-home option - it will split your photo into 8.5x11 pieces that you just need to print separately and assemble!

Wednesday, May 26, 2010

Revisited: Lucite Shelves

A while ago I posted about a gorgeous room I saw on decor8:

Beautiful Office
Office designed by Vanessa De Vargas

It seems as though people are stumbling upon that post when searching for 'lucite shelves' so I thought a revisit was in order... especially once I saw a recent post on Little Green Notebook about Plexi-Craft: how cute are these shelf options?!

Lucite Shelves

Top to bottom: Shelf with brackets (the most like the original photo) :: U Shelf (love it!)
::
Corner Shelf :: Simple Bent Shelf

As for the wallpaper in the background, these golden styles caught my eye:

Wallpapers in Gold

1) Divine : Purple and Gold Wallpaper
2) Desire: Teal Wallpaper
3) Pemberley : Gold Wallpaper
4) Knit: Cavern Home Knit Wallpaper


Though the original golden wallpaper was so pretty, I also love the idea of these shelves on a more colorful background like these:

Lovely Wallpaper
Left-to-right: Julia Rothman for Hygge and West: Daydream in Blue
Paeonia Wallpaper
Dotswold Wallpaper

If you see any pictures of this implemented (or do it yourself!), please share - I'd love to see it!

Tuesday, May 25, 2010

DIY idea: Cupcake Toppers

My sister is getting married this summer, so right now I am busy planning her Bachelorette Party in June... we'll have a hotel suite to hang out in before heading out on the town, so I'm brainstorming ideas for decorations and snacks to serve.

I came across this adorable idea over on
SwissMiss - its the perfect mix of dessert and decor! She makes these personalized cupcake toppers for her daughter Ella's birthday each year - aren't these the cutest thing ever?!

Cupcake toppers
Birthdays 1, 2, 3, and 4


The circles are cute, but also love the idea of a 2-layer topper, like these great examples:


Cupcake Toppers
On the left via
Hostess with the Mostess :: On the right via The TomKat Studio


If you're not inclined to make these on your own,
etsy is full of stores willing do the hard work for you!

Friday, May 21, 2010

Succulent Centerpiece

While in Boise we're staying at the very cute Boise Guest House... and in the shared back courtyard I noticed these adorable potted succulents as a centerpiece on the picnic table. What a cute and low-maintenance way to spruce up an outdoor space!

Succulent Centerpiece

Succulent Centerpiece

I hope everyone has a wonderful weekend!

Thursday, May 20, 2010

Party Decor: Tissue Pom Pom

One of my favorite - and easy and inexpensive! - ways to liven up a space when entertaining is using homemade tissue pom poms.

Tissue Paper PomPoms Outside
Pom decorations on my front porch for a baby shower

I use the directions on Martha Stewart... she also sells a kit at Michaels, but you really don't need it... any tissue paper will work! She recommends pointed or rounded edges but I am partail to the rounded - the pointy never seems to look quite as cute for me.
Tissue Paper PomPoms
Poms decorating a Bachelorette Party Brunch

I've also found that it works best with thinner tissue - printed, waxy-ish patterned tissue just isnt as easy to work with. If you have more than one color, a great way to tie it all togethes is to make some poms with alternating tissue colors. Just be patient and work slowly when pulling apart the layers... always pull from as close to the center as possible, then work your way out.

Wednesday, May 19, 2010

Watch out for Gators!

Today's post comes courtesy of J's cousin, who is getting married on Kiawah Island (in South Carolina) this fall... apparently there are tons of alligators on the island so she is looking for a cute way to incorporate this common island sighting into the favors.


How cute are these edible gators?!


Edible Alligators

Clockwise from top left:
:: Gator Cookies from Lori's Place on etsy ~ $32 for 15 cookies ($2.20 each). She has these listed as part of a Reptile assortment, but I'm sure would do all gators if requested!
:: Oval Gator Lollipops from Christine's Chocolate Creations on etsy ~ $20 for 20, buyer can choose the color of the gator & background, also available without the stick.
:: Choc-o-Gator from Anastasia's Confections ~ $4.50 for 6 ($0.75 each)
:: Detailed Gator Lollipops from AmySweetTreats ~ $20 for 12 ($1.66 each)


Once you have your adorable edible treats, how to display them? There are two general options: place one with each place setting, or set them all out in a central location. If putting them at each place setting, they'd be cute in a small poly bag with a ribbon that coordinates to the wedding colors (see the Oval Pops picture above)... even better, make it a personalized ribbon with the wedding details. Also be sure to tie on a tag explaining the significance of the alligator to the location. For chocolates without the stick, the bag would still be cute, or put them in these adorable party cracker-inspired tubes or a cute cylindrical container (both clear or tin with a window top would be great).


Favor Packaging Ideas

Left to right: Fancy Candy tubes from Martha Stewart :: Personalized Ribbon from Beau Coup :: Cylinder Containers from Martha Stewart


Putting all the favors in one spot, allowing guests to grab their own, would also be a great way to make a big impact. Put each favor in a clear baggy - close it off either with a ribbon (like above) or just fold it over and seal with a sticker (personalized would be so cute!) then display all of the gators on a bed of 'sand' made of turbinado sugar (Sugar in the Raw). If using cookies or stick-less chocolates, stand up the baggies on the sugar... if using lollipop-style chocolates, line the bottom of your container with styrofoam before adding the sugar so the sticks have something to stick into.Sugar Sand
Favors displayed on a bed of 'sand' via Martha Stewart
Make sure to include a sign instructing guests to take one and explaining the significance of the gator to the location.


To make the event even more pulled-together, include the alligator theme elsewhere... I love the idea of including some alligator gummies (from Candy Warehouse) or an alligator-shaped soap (from Bath Time Bouquets on etsy - you pick the color and scent) in the out-of-town bags.

More Gator Favors


If alligators aren't your thing, the ideas above could all be adjusted for a different animal or motif!

Tuesday, May 18, 2010

Ch-ch-ch-changes!

For anyone still out there after such a long, long time away on my part, I am so sorry for my absence! There have been quite a few changes in my life over the last couple months and time has gotten away from me.

So, what are those changes?! I finally quit my corporate job (the one I worked at for just over 4 years and have been complaining about for just under 4 years :) and am taking some time to figure out my next move professionally. I've been talking for as long as I can remember about starting my own business, so trying to figure that out a bit more. The other exciting thing is that J and I (and Frank + Boozer) decided to take advantage of my newfound freedom and are taking an extended vacation/ road trip out west. We drove out to Colorado (from Chicago) and spent some time, then traveled through Utah and now are in Boise, Idaho for a while... in a few weeks we'll make our way back to the midwest via Wyoming and South Dakota, with stops at Yellowstone and the Badlands. I know, crazy, right?!


The other thing is... I have been thinking about my little corner of the internet and what I want to do with it and am excited to make With a Flourish the best it can be. So while I've been away way too long, I am now coming back with renewed energy and bursting with ideas to share. I hope you'll stick around too!