Friday, December 10, 2010

Best I've Read (this week)

Each week I come across so much online each week that I can't wait to to share... so I'm not! (waiting, that is...) 


Here are some online goodies that made me happy as I stumbled across them this week... hope they make you happy  too!
* Crafty Gift Guide. 'Cause we all know you can never have enough projects going on at once
* Beautiful Gift Wrapping closet... who has room for this?! Ah, we can dream...
* Loving these holiday ideas: 2D Tree of Lights (amazing how something simple can be so pretty!) and the trend in Potted Christmas Trees (found via Little Green Notebook)
* DIY Foot Balm - great gift idea, even if just for yourself

Hope that everyone has a wonderful weekend!

Wednesday, December 8, 2010

Words of Wisdom: Passing Time

I've mentioned a few times before that I have a thing for quotations... just came across this one and love it... hope you do too!

Passing Time and Fear

Tuesday, December 7, 2010

Yummy Matzo

Roommates over the years found it strange, but I've always liked Matzo, as far as crackers go. As a kid we'd have it in our tomato soup (instead of more 'traditional' saltines or oyster crackers) - it has the perfect light taste + crunchy texture. And that's as far as my Matzo enjoyment has ever gone... until now.

Over at The Kitchn I came across this recipe for toffee & chocolate-covered matzo. The post explains "We call it matzo crack. It's just that addictive." Um, sign me up.

Picture from The Kitchn

Its perfect timing, too... this weekend we're headed to the 'burbs to celebrate Hanukkah with aunts, uncles, and cousins. My dad's side of the family is Jewish & though its not the most traditional celebration (Christmas trees are involved), it always includes lots of yummy latkes with applesauce. (Everyone leaves their coats in the car, or else you'll smell like latkes for weeks! :) The gift exchanges are really just for the kids, but I always like to bring a little something for the adults... and this will be the perfect little treat!

Monday, December 6, 2010

Paper Gift Topper (with a side of amazing)

I'm working to wrap the gifts for my young cousins & second cousins and was looking for ideas as to how to label/ decorate the boxes... and came across this project from The Crafts Department over at Martha Stewart. Seriously - how amazing is this?!

I don't know that I have the patience to do this on my own, but I love the end result. This would also be a cute way to create the labels for a buffet or appetizers for a Shower. So inspiring!

PS - In case you missed it, my jinglebell-and-holly present toppers from a few years ago!

Monday, November 22, 2010

Cranberry Holiday Decor

I came across these gorgeous topiaries via Apartment Therapy - wouldn't they make great decorations for this time of year?!

I'd be curious as to how long these would last - I know you can make garlands out of cranberries, to hopefully that means that the effort to make the topiaries (it does seem a bit tedious...) would make for a long-lasting display?

I'm not normally a big fan of eating cranberries (the slimy canned cranberry sauce totally creeps me out, though I know lots of people love it!), but this recipe for Cranberry and Pumpkin muffins may just help me change my mind! Doesn't that sound yummy?

Tuesday, November 9, 2010

Amazing Lamp Tramsformation

I came across this amazing project over on Dwellings by DeVore - she took these old lamps and some shades (both thrift finds)...

And created these!
Amazing, right?! Reminds me a little bit of these ones I was fawning over last year...

Tuesday, November 2, 2010

Supper Club: Game Night

I can't believe I am going to admit this, but my parents were right. See, when I was a teenager and my friends and I would complain that there is nothing to do, they'd suggest we play a game. And we'd roll our eyes and laugh and them, because that was just soooo dorky. Now, as an adult (when did that happen?!), I see the error of my ways and love a good Game Night!

The food part of a Game Night can be pretty simple, or you can focus on appetizers/ small plates that can be shared during the game playing.

Game Night

The favorite games among my friends?! Catch Phrase is always fun and is great for a group. I like that it is a good ice breaker if everyone doesn't know one another well. My personal favorite is Cranium Pop 5 - this game is so much fun, you must try it! In the original Cranium, you had to perform the task (hum, draw, sculpt, act) your team landed on while traveling around the board, but in this version you get to choose what to do - the creative freedom is hilarious!

PS - sorry I've been a bit MIA around here... but thanks for sticking around! I have big plans in store!!

Wednesday, October 20, 2010

Fall is Here

I'm not a huge fan of the winter or cold weather. Which is unfortunate, given that I live in Chicago. Just this week the weather really turned and we seem to be officially in Fall. The weather isn't so bad yet, but I'm mourning the long winter ahead... but these pretty flowers spotted at Pike's Place Market this summer are helping to cheer me up for now!

Peonies
The market was filled with gorgeous goodies of all kinds, but the flower vendors had me mesmerized by their buckets and buckets of gorgeous blooms. Peonies just always seem so happy and luxurious to me... all those fabulous fluffy petals!

Monday, October 18, 2010

Supper Club: Look to Restaurants for Inspiration

I'm becoming a better cook with practice, but often I get stumped just trying to think of what to make. (Worrying about my ability to actually make it comes next! ;) A trick that works for me is to look to our favorite restaurants and steal ideas from their menu... and that's how we came up with one of my favorite appetizers to serve guests: bruchetta with a twist.

Non-Traditional Bruchetta
forgive the bad phone photo...

These are super easy to make and are really yummy. Our favorite combinations are:
Brie and Apples - slice both thinly, then put the brie down, the apples on top. Top with a little bit of black pepper and a drizzle of olive oil
Ricotta, Pistachios, and Honey: just like it sounds - so simple! OK, the pistachios always need to be de-shelled, so there is some work needed...

I just slice french bread, brush with olive oil, and bake at 350 for ~10 minutes so its nice and crisp (adjust time/ temp if you like your bread softer). Then add the toppings and you're done!

Tuesday, October 12, 2010

Supper Club: Do Brunch Instead

At certain times of the year, it can be next to impossible to find a weekend night where a whole group of friends will all be in town and have no plans... this summer was like that with our Supper Club groups and I know that we'll have a similar situation as we get into the holiday season and all the guests, parties, and trips they always entail.

Photo by groovehouse (Flickr)
So what's a Supper Club to do? Meet for Brunch! We recently did this with some friends and it was great - we got to hang out and catch up, and everyone got to have a yummy breakfast to start their day - win-win!

The Menu:

  • Waffles: I used this Martha Stewart recipie - I used (for the second time) the waffle maker we got as a wedding gift... 5 years ago!
  • Waffle Toppings: Strawberries (add some sugar to the fresh berries and let sit for a few hours - this will create a natural syrup - yum!), Caramel Bananas (this was sooo good), Whipped Cream, Butter and Syrup
  • Scrambled Eggs
  • Sausage, Bacon, Turkey Bacon... how much meat and the variety will depend on your group
  • Toast, Bagels, etc... one of our friends contributed with some fresh bagels and cream cheese
  • To drink: Coffee, OJ, Mimosas
  • this Martha Stewart
And thats it! It was pretty easy to pull together, but was such a fun, delicious way to start the day.

Friday, October 8, 2010

Photo "Tile' Wall Art

Late last week I teased with a picture, promising a reveal as to what I had done with it. I considered just blowing it up, but since that could be expensive and also just too simple, I decided to split it into individual 4x6" photos and hang a 'tile' art piece on the wall in our dining area:

Photo Tile Wall Art
Curious to see the work-in-progress? I had the original photo (which I took) and then split it into 36 parts in photoshop, giving me this:
Photo Tile - Pieces
I then had the 36 pictures developed at my local drug store and bought a bunch of Ikea Clips frames (at $0.99 for 4, such a steal!) - I wanted the frames to be almost invisible and visually disappear, so I knew these would perfectly do the trick. Then I sat down in front of some trashy reality tv (not required, but helps the time go by!) and put my pictures into the frames. I carefully labeled each one of the 36 pictures with the row (1-6) and column number (1-6) where it belonged - each assembled frame ended up with a post-it note labeled something like "2,3" (2nd row, 3rd column).
Photo Tile- Work in Progress
Before I could hang the (many) frames, I had to determine where each one would go. I gathered my supplies: painters tape (I used the width to measure the gaps between frames), my laser level (invaluable for this project), a measuring tape, and a hammer and nails. I determined where the middle-top of the whole thing would go and then measured from there.
Photo Tile- Work in Progress
I used the paper that came in the frames as a measuring guide and did a row at a time. As I comleted marking off each row, I hung the frames for each row to determine where the nail would go - the clips weren't always perfectly centered, so I could ensure that the nail was in the right spot to make it hang straight. I then took down the frames until everything was marked and all nails in the wall. Then... almost done! Take down all the tape and hang the frames, and it's complete!
Photo Tile on the Wall
Photo Tile Wall Art

Wednesday, October 6, 2010

Supper Club follow-up: Sushi Decor

Yesterday we talked about making sushi, but we're not done yet... your guests need to be able to sit at the table and enjoy their creations! When serving sushi you have to make sure each person has their own dipping bowl for soy sauce- I love these ones from Crate and Barrel:

(Non Traditional) Sushi Accessories
Clockwise from top: Rectangular Dish, Square Dipping Bowls, and Deep Sauce Dish
 

I have the small white ones, which we bought for this purpose... but I actually end up using them more than I expected whenever I need a small dish (they're great for holding olive oil you need to brush onto dough, etc). In general, I tend to buy all white so I can change my accessories and color theme easily, but love those colored ones too! I also got a couple of the longer dishes for putting out wasabi and ginger for the table to share.


Picture via Amy Atlas


Of course, no party would be complete without some craftiness! No need for fancy chopsticks, but replace the paper wrapper with something pretty... how gorgeous are these ones from Amy Atlas?! (Created by Twig and Thistle). Follow the link for instructions, or use this alternate version from Zakka Life.


For decor, I love the idea of making some paper cranes (you can find instructions here), a Japanese symbol of long life, prosperity and good health. It would be adorable to leave one at each place setting, or make a bunch, string them up, and hang from the ceiling over the table... Here are some great instructions for stringing cranes from a bride who made 1000 for her wedding(!).

Strings of Hanging Cranes
Top: Cheap Wedding Planning,
Bottom:
Woodward + Rick Photographers via Wedding Paper Divas and Green Wedding Shoes


Hope you're inspired to have your own sushi party... if you do, I'd love to see pictures!

Monday, October 4, 2010

Supper Club: Roll Your Own Sushi


Photo from Frenkieb (Flickr)

You have our friends Chris & Maura to thank for this idea... they had a Sushi Making Party for one of our Supper Club get-togethers and it was so much fun! Rolling sushi is one of those things I had heard people do at home, but I had never tried it before... but is was so much easier than I expected and was a fun hands-on party. Everyone made rolls and then we put them on a big platter in the middle of the table and were able to enjoy one another's creations - yum!

Supplies/ Ingredients:
* Sushi Rolling Mat: we only had 2 for 6 people and were fine to share... I've seen instructions online for rolling without mats (use fabric & put saran wrap over it to prevent sticking), but the mats made it feel so much more authentic and were fun to use
* Nori: seaweed sheets
* Sushi Rice: its important that you use rice labeled to be for sushi, so that it is sticky enough for the job. Traditionally, the rice is made with vinegar (here's a recipe from Better Homes & Gardens)
* Fillings for your sushi... our friends went to a local fish market and were given advice on what seafood to use. Don't forget the veggies too! I don't eat seafood, but love avocado, cucumber, asparagus and carrots in my sushi rolls.
* A bowl of water near where you'll be making the rolls
* Soy sauce and wasabi (Japanese horseradish) for dipping
* Optional: toasted sesame seeds and fish eggs (for the outside of your inside-out rolls), tempura crispies (look at a local Asian market)

Instructions:
1. Make sure your sushi mat is clean (you'll want to rinse it off between making rolls) & then place a piece of nori on it, shiny-side down
2. Put 1/2-2/3 cup of rice on the nori and spread it around very thin. You can use your hands or a flat wooden spoon, but use the bowl of water to keep your hands wet to prevent the rice from sticking. Be sure to leave about 1/2 an inch at the top empty and free of rice
Sushi from above
Picture from futureshape (Flickr)

3. Place your desired fillings across the mat, about 1/3 up from the bottom edge. You can even have your fillings stick out the ends for a fancy effect once cut. :)
4.Using the rolling mat, begin to tightly roll the sushi. Start at the side nearest to you, and roll away from you. Make sure you don’t roll the rolling mat into your sushi... as you get the mat to the point where it would be rolled into the rice, roll it backwards upon itself. See this video for an example, its much easier to see it done than explain it in words! The most important thing is that you roll the sushi tightly - keep a lot of pressure on your mat and sushi as you roll to ensure a tight roll that will be easier to cut and eat.
Homemade "Sushi"5. Before you get to the end (where you left the nori uncovered by rice), use your fingers to put some water on that exposed edge - this will help the edge of the nori to stick to itself when rolled. When the sushi is completely rolled, use the rolling mat to give the sushi a final squeeze so it does not unroll when you are trying to cut it.
6.Cut your roll into pieces, depending on how thick you like your sushi. If you're having trouble with the rice sticking to the knife, it can also help to wet your knife between cuts.
7. Enjoy your creation!
If you want an inside-out roll (where the rice is on the outside), just flip the nori over between steps 2 & 3. You can then put some sesame seeds on the rice after rolling.

Still want more instructions and examples? I liked these tutorials:

Friday, October 1, 2010

A Spark of Creativity

Remember when I said that I loved the idea of an oversized focal point? Well, below is a sneak peek of a project I've been working on & will share with you next week:

Sparkler

Hope you have a wonderful weekend!

Thursday, September 30, 2010

Handmade Holidays: time to start?

Last night, while at screenprinting class, our teacher showed an example of some fabric she's been decorating to use in a quilt she has been working on... that will be a Christmas gift. The holidays? Already?

Her comment kinda shocked me (I'm still pretending that summer isn't over!), but she has the right idea... might as well get started now so its not a mad dash at the last second and you dont have to assemble gifts in the backseat of the car on the way to your aunt's family gathering. Not that I was doing that last year as J drove us to the suburbs... anyhoo...

So now I'm inspired to get started on my projects. Though the first step is to choose what I want to make! I came across these felted stuffed animals from Martha Stewart I bookmarked a while ago and think this little pig is too cute to pass up any longer (love that tail!).

Picture from Abbey Goes Design Scouting. Adorable.

Anyone else planning to make gifts for the holidays? Would love to hear what you're planning... I need ideas!

(PS: here are some of the projects from last year!)

Wednesday, September 29, 2010

Fabric Painting for Non-Painters: Freezer Paper Stencil

Often feel like items I sew or buy need a little something extra... I do know how to screenprint, but often what I want to do is a one-time project, so I need a simpler approach. My favorite go-to technique is using a Freezer Paper Stencil. Ridiculously simple and inexpensive, I recently used it to decorate a canvas bag I was giving my cousin with her birthday present inside.
Supplies:
* Design you want to stencil onto the item - I chose to do her first initial, so printed out a big, fancy "R". (For this technique, pick something relatively simple in black & white)
* Freezer Paper - you can find it at your local grocery store near the plastic wrap and aluminum foil... but be sure to buy freezer paper, not waxed paper!
* Pen/ Pencil/ Marker
* Scissors or an exacto knife to cut out your design
* Fabric Paint
* Paintbrush (I like the foam brushes)

Freezer Paper Stencil


Instructions:
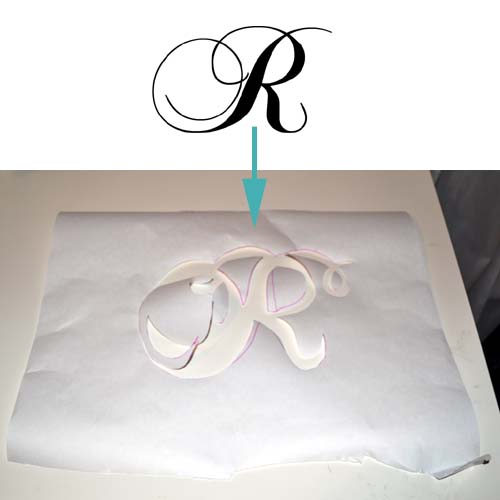
1. Print out your design... here you can see the "R" I used (Chopin Script, for anyone who is interested!)
2. I place the printout under the freezer paper (shiny side down!) & trace around the edges with a pen/ marker. You want to trace around the outside edges of all printed (black, in my example) areas. The freezer paper has wax on one side (the shiny side), so you want to be sure that this is the 'back' of your stencil.
3. One I have the design on the freezer paper, cut on the lines: you'll end up removing the printed/ black areas, so that all is left is everything except the design you want to paint. The really neat thing about this approach is that you can have 'floating' areas, like inside the top of the "R" - with a traditional stencil, all pieces need to be connected, so this is a great perk of the freezer paper stencil.


Freezer Paper Stencil Steps

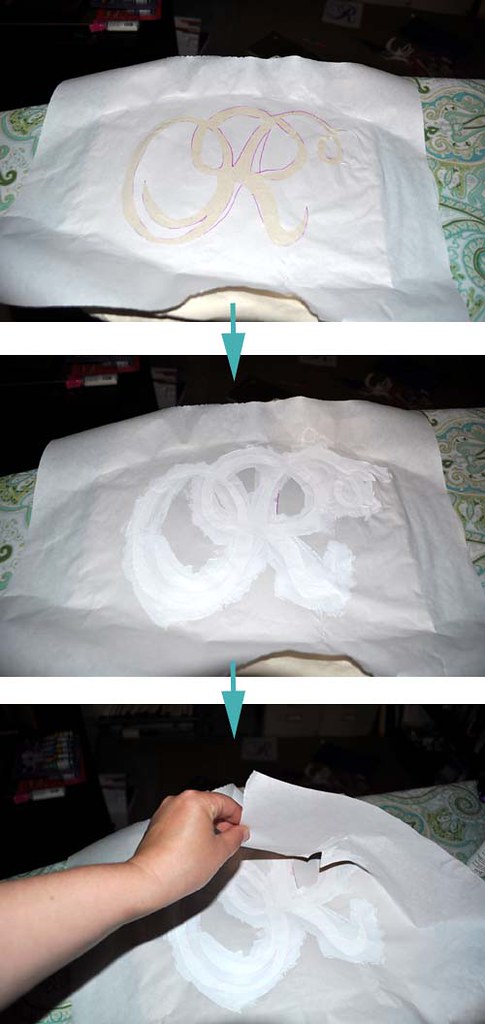
4. Once the design is cut out, iron the freezer paper stencil you just created onto the fabric, using the warmest setting available for your fabric. Make sure that you place it exactly where you want to apply the design, and pay special attention to the edges to make sure that there is a good bond between the fabric and stencil.
5. Paint in the design! Paint over all the open areas (where your fabric is exposed) - I like to do two coats (letting them dry completely in-between)
6. Let the paint dry completely and then peel off your freezer paper stencil


Almost done... Read the instructions on your fabric paint for how to make it permanent - normally you need to heat-set (iron) the paint after its been applied to ensure it wont wash off. Then, admire your finished product!


Finished Bag
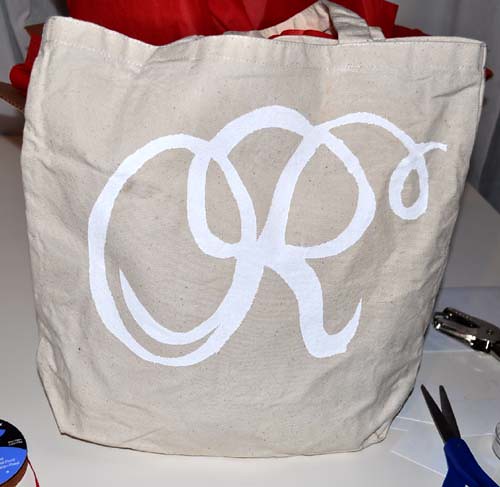
So cute... and so much better than the plain bag!

Tuesday, September 28, 2010

Beautiful Inspiration

I have a soft spot for quotations and inspirational words... as a teenager I paint-penned them around my room on my inexpensive shelves (as you imagine, didn't really look quite as cool as I pretended!).

These days I fulfill the need for inspirational words and pretty things together with inspirational posters/ prints - our home office is covered in them and while my husband would argue that we have more than enough, I just don't see how that could ever be possible. To compromise, I sometimes 'window' shop online... as I'm doing over at Eva Juliet's etsy shop (which I just found via To Be Charmed). How lovely are these prints?!

Never Too Late, by Eva Juliet

Monday, September 27, 2010

Supper Club: Keep it Simple!

When we first started having Supper Club get-togethers, I was stressed out about my first hosting. See, I don't really cook. I've gotten better over the years as I've had more occassions and practice (Last year I served Easter dinner for 10, with a ham & lamb! Serious progress!), but having people over makes me feel like I need to prepare a Martha Stewart-worthy spread. Which of course would be amazing, but certainly has not always been within my reach.

Baked Ziti
Image via Real Simple, picture by Petrina Tinslay
The thing is, your friends are coming over to see you, not judge your cooking! They want to chat and share a meal (with my friends, and some wine!) and hang out. So my advice to you is not to stress out too much over the food... make an old standby that you know turns out well - nobody (except your significant other!) will know that its your 'go to' dish.

My favorite meal is this Baked Ziti recipe from Real Simple, though I normally make it without the meat (I'm veggie) and prefer to use a Campanelle pasta (the ruffled edge & loose spiral are great in a baked dish). I'm a huge baked pasta fan for dinner parties - you can make it ahead of time (and it often tastes better if you do!) and then it can be baking as your guests arrive, making sure that you can hang out and mingle instead of slaving over the stove.
On that note, I think that Real Simple has great, simple (pun intended) recipes for anyone just starting to cook. Plus the reviews and comments are invaluable when choosing something worthwhile to try.
We typically have the host family provide the main course, and then others help bring sides/ appetizers/ dessert/ wine... two of my favorite appetizers are an Herbed Ricotta spread (seriously so easy - literally just ricotta and herbs)- in the summer I have fresh herbs in the backyard, so its basically the simplest, cheapest - yet super yummy! - thing to make. The other favorite (which I've mentioned before) is a cheese fondue. Get some fruit, veggies, and bread for dipping, follow this easy recipe, and you're all set!

Fondue & Dippers

So while I dont think you need to stress out about what exactly you're serving, I do think you need to set a nice table like grownups. Use real dishes and silverware, cloth napkins, and put out some flowers. No matter what you're serving, those small steps will really help show your guests that you care about them and want them to have a memorable evening.

Friday, September 24, 2010

New Series: Supper Club!

Lonely table.I love a good get-together - of course special occassions, showers, and parties are super fun, but really what we do most of are smaller, casual gatherings with a group of friends. We have two sets of friends (4 couples in each) that try to get together once a month... everyone is so busy, that its nice to have a little 'club' to help make sure we get to see one another. Sometimes we meet out at a restaurant, but mostly we just rotate around hosting and have one another over for dinner... especially in these tougher economic times, its nice for everyone to get to spend time with friends but not have the night cost a fortune!

SO... whats the reason I'm telling you all this?!
Picture from vasta on flickr

One of the topics that I love in real life and have been meaning to talk about more here is entertaining. So on Monday I'll be kicking off an 8-week series called...


Every Monday for the next eight weeks (September 27 - November 16) I'll share menu and theme ideas, and hopefully will inspire you to host a Supper Club get-together of your own!

Monday, June 21, 2010

Modern Floating Frames

I recently came across these Wexel Art acrylic frames on Ohdeedoh and can't get them out of my mind.

Wexel Acrylic Frames

They'd be great as a way to hang a collage of items (maybe from your wedding, new baby, travels...) but seem so much more modern to me than doing a shadowbox. Since the frame almost acts like a scrapbook page there no need to worry about having things displayed at different depths... so much simpler!


Wexel Acrylic Frames

I also love the idea of splitting a picture with the Rasterbator (mentioned here) and doing a grid of frames with an 8x10 portion of the photo in each one.

Thursday, June 17, 2010

Natural Inspiration

Sorry for the spotty posting lately... I'm on vacation in the beautiful west (Yellowstone and Grand Teton National Parks) and am trying to spend as much time outdoors as possible, soaking it all up.

Isnt it gorgeous here?! I promise to be back full-time next week!

Wednesday, June 16, 2010

Magnetic Art Idea

While staying at the adorable Boise Guest House, I loved the artwork hanging above the couch in our apartment (Boozer is also enjoying it!):

Magnetic Artwork Idea

Looking more closely, I realized that each individual square was actually a painted block (I'm pretty sure it was encaustic-style painting) with magnets on the back... what a cute idea to recreate at home! I love how the squares can easily be moved around, so your artwork can constantly be changing.

Magnetic Artwork Idea

Magnetic Artwork Idea
This could easily be recreated using a similar magnetic board - I am pretty sure that the metal board in the background is from Ikea, like this one. Get boards like these (I like the 4x4 size) or even some borderless frames and attache some strong magnets to the back. To decorate the squares, different patterned papers or wallpaper scraps would be great, or even just paint them different solid colors and this would also be cute with some favorite photos.

Such a simple (and inexpensive!) idea, but such a big impact... my kind of project!

Thursday, June 3, 2010

Business Advice

I've been talking for years (literally years... almost 10!) about wanting to start my own business... and now that I am job-free, it is time to bite the bullet and see what I can do. Its exciting but also scary and overwhelming. Part of what makes it so hard is not knowing how to go about things... so of course I am turning to blogland for some guidance and inspiration. While I dont know anyone in 'real life' that has done what I am trying to do, but it helps to know that there are so many people sharing their stories out there!

Some links I've had bookmarked for a while:

Business Blogs
Top to Bottom:
:: Design Sponge's Biz Ladies posts
:: Modish Biz Tips (no longer being updated, but lots of good info there!)
:: Jenny Hart's posts on VenusZine (also older, but her Sublime Stitching is amazing, so have to check it out)
:: Etsy's Blog, The Storque
:: Craft Magazine's Blog

If you have any resources to share, I'd love to hear about them!

Wednesday, June 2, 2010

Craft Review: Memory Game

I just realized that I never gave an update on the Memory Game I made a while ago (yes, as a Christmas gift!). I originally got the idea here, and as soon as I saw it knew it would be the perfect gift for my 5-year old cousin (really my cousin's child, but 'cousin' is so much easier to say! :).

Instead of different patterns, I used pictures of his family (parents, siblings, grandparents, etc) and their pets as the matching items and some patterned scrapbooking paper as the backing.


Memory Game

The key difference I made from the original idea was to use clear contact paper instead of mod podge. Actually, I used mod podge originally and it was horrible - everything ended up lumpy and kinda stuck together, plus it looked like a kindergarten project. (Ironically, I was making the gift for a kindergartener...) I am not an expert decoupager (is that even a word?!) by any means, so generally have trouble with the stuff (except for this project), so wasn't really surprised. I ended up tearing the paper squares off the wood and starting over and was so happy I did - the contact paper was smooth and shiny and even added a layer of kid-proofing for dirty hands.

I then made a drawstring bag (using this pattern again - always works well!) to house the game. To finish things off, I printed "The Memory Game" and the instructions used some iron-on printer fabric (like this- my local Joann's always has some by the Quilting section) and attached to each side of the bag.

Memory Game

Above is the recipient enjoying his new game. Turned out pretty cute, if I do say so myself!

Thursday, May 27, 2010

Focal Point - Oversize Art

I recently came across pictures of this living room on Apartment Therapy and fell in love with the large photograph over the couch:

Artwork Inspiration
Pictures from "Genevieve and Maxwell's Mid Century Perch" House Tour on
Apartment Therapy

I think I may steal this idea for a wall in our kitchen/ dining area... currently some artwork that I painted is hung there, but don't really love it and have been trying to decide the right replacement. I can't afford a professional piece of art like shown above (House Tour comments indicate the photo is by Kelly Barrie), but this would be great (and even more meaningful!) to implement with a personal photo.

I think what would keep the same feel is to do something abstract. It could be fun to shake up a champagne bottle and see what shots you get out of it. Last summer a friend's wedding had sparklers as the bride and groom exited and they looked great in pictures - a close-up of the sparks would also make for a really neat shot.
Artwork Inspiration
To really make an impact, a key factor here is size - you need the photo to be big! I have used PerfectPosters in the past and was happy with the result (glossy, photo-paper finish), but the print would also be great on a canvas like this. Or, try out The Rasterbator (more info here) for a print-at-home option - it will split your photo into 8.5x11 pieces that you just need to print separately and assemble!

Wednesday, May 26, 2010

Revisited: Lucite Shelves

A while ago I posted about a gorgeous room I saw on decor8:

Beautiful Office
Office designed by Vanessa De Vargas

It seems as though people are stumbling upon that post when searching for 'lucite shelves' so I thought a revisit was in order... especially once I saw a recent post on Little Green Notebook about Plexi-Craft: how cute are these shelf options?!

Lucite Shelves

Top to bottom: Shelf with brackets (the most like the original photo) :: U Shelf (love it!)
::
Corner Shelf :: Simple Bent Shelf

As for the wallpaper in the background, these golden styles caught my eye:

Wallpapers in Gold

1) Divine : Purple and Gold Wallpaper
2) Desire: Teal Wallpaper
3) Pemberley : Gold Wallpaper
4) Knit: Cavern Home Knit Wallpaper


Though the original golden wallpaper was so pretty, I also love the idea of these shelves on a more colorful background like these:

Lovely Wallpaper
Left-to-right: Julia Rothman for Hygge and West: Daydream in Blue
Paeonia Wallpaper
Dotswold Wallpaper

If you see any pictures of this implemented (or do it yourself!), please share - I'd love to see it!

Tuesday, May 25, 2010

DIY idea: Cupcake Toppers

My sister is getting married this summer, so right now I am busy planning her Bachelorette Party in June... we'll have a hotel suite to hang out in before heading out on the town, so I'm brainstorming ideas for decorations and snacks to serve.

I came across this adorable idea over on
SwissMiss - its the perfect mix of dessert and decor! She makes these personalized cupcake toppers for her daughter Ella's birthday each year - aren't these the cutest thing ever?!

Cupcake toppers
Birthdays 1, 2, 3, and 4


The circles are cute, but also love the idea of a 2-layer topper, like these great examples:


Cupcake Toppers
On the left via
Hostess with the Mostess :: On the right via The TomKat Studio


If you're not inclined to make these on your own,
etsy is full of stores willing do the hard work for you!