Wednesday, October 20, 2010

Fall is Here

I'm not a huge fan of the winter or cold weather. Which is unfortunate, given that I live in Chicago. Just this week the weather really turned and we seem to be officially in Fall. The weather isn't so bad yet, but I'm mourning the long winter ahead... but these pretty flowers spotted at Pike's Place Market this summer are helping to cheer me up for now!

Peonies
The market was filled with gorgeous goodies of all kinds, but the flower vendors had me mesmerized by their buckets and buckets of gorgeous blooms. Peonies just always seem so happy and luxurious to me... all those fabulous fluffy petals!

Monday, October 18, 2010

Supper Club: Look to Restaurants for Inspiration

I'm becoming a better cook with practice, but often I get stumped just trying to think of what to make. (Worrying about my ability to actually make it comes next! ;) A trick that works for me is to look to our favorite restaurants and steal ideas from their menu... and that's how we came up with one of my favorite appetizers to serve guests: bruchetta with a twist.

Non-Traditional Bruchetta
forgive the bad phone photo...

These are super easy to make and are really yummy. Our favorite combinations are:
Brie and Apples - slice both thinly, then put the brie down, the apples on top. Top with a little bit of black pepper and a drizzle of olive oil
Ricotta, Pistachios, and Honey: just like it sounds - so simple! OK, the pistachios always need to be de-shelled, so there is some work needed...

I just slice french bread, brush with olive oil, and bake at 350 for ~10 minutes so its nice and crisp (adjust time/ temp if you like your bread softer). Then add the toppings and you're done!

Tuesday, October 12, 2010

Supper Club: Do Brunch Instead

At certain times of the year, it can be next to impossible to find a weekend night where a whole group of friends will all be in town and have no plans... this summer was like that with our Supper Club groups and I know that we'll have a similar situation as we get into the holiday season and all the guests, parties, and trips they always entail.

Photo by groovehouse (Flickr)
So what's a Supper Club to do? Meet for Brunch! We recently did this with some friends and it was great - we got to hang out and catch up, and everyone got to have a yummy breakfast to start their day - win-win!

The Menu:

  • Waffles: I used this Martha Stewart recipie - I used (for the second time) the waffle maker we got as a wedding gift... 5 years ago!
  • Waffle Toppings: Strawberries (add some sugar to the fresh berries and let sit for a few hours - this will create a natural syrup - yum!), Caramel Bananas (this was sooo good), Whipped Cream, Butter and Syrup
  • Scrambled Eggs
  • Sausage, Bacon, Turkey Bacon... how much meat and the variety will depend on your group
  • Toast, Bagels, etc... one of our friends contributed with some fresh bagels and cream cheese
  • To drink: Coffee, OJ, Mimosas
  • this Martha Stewart
And thats it! It was pretty easy to pull together, but was such a fun, delicious way to start the day.

Friday, October 8, 2010

Photo "Tile' Wall Art

Late last week I teased with a picture, promising a reveal as to what I had done with it. I considered just blowing it up, but since that could be expensive and also just too simple, I decided to split it into individual 4x6" photos and hang a 'tile' art piece on the wall in our dining area:

Photo Tile Wall Art
Curious to see the work-in-progress? I had the original photo (which I took) and then split it into 36 parts in photoshop, giving me this:
Photo Tile - Pieces
I then had the 36 pictures developed at my local drug store and bought a bunch of Ikea Clips frames (at $0.99 for 4, such a steal!) - I wanted the frames to be almost invisible and visually disappear, so I knew these would perfectly do the trick. Then I sat down in front of some trashy reality tv (not required, but helps the time go by!) and put my pictures into the frames. I carefully labeled each one of the 36 pictures with the row (1-6) and column number (1-6) where it belonged - each assembled frame ended up with a post-it note labeled something like "2,3" (2nd row, 3rd column).
Photo Tile- Work in Progress
Before I could hang the (many) frames, I had to determine where each one would go. I gathered my supplies: painters tape (I used the width to measure the gaps between frames), my laser level (invaluable for this project), a measuring tape, and a hammer and nails. I determined where the middle-top of the whole thing would go and then measured from there.
Photo Tile- Work in Progress
I used the paper that came in the frames as a measuring guide and did a row at a time. As I comleted marking off each row, I hung the frames for each row to determine where the nail would go - the clips weren't always perfectly centered, so I could ensure that the nail was in the right spot to make it hang straight. I then took down the frames until everything was marked and all nails in the wall. Then... almost done! Take down all the tape and hang the frames, and it's complete!
Photo Tile on the Wall
Photo Tile Wall Art

Wednesday, October 6, 2010

Supper Club follow-up: Sushi Decor

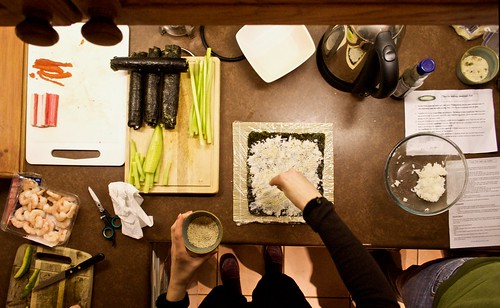
Yesterday we talked about making sushi, but we're not done yet... your guests need to be able to sit at the table and enjoy their creations! When serving sushi you have to make sure each person has their own dipping bowl for soy sauce- I love these ones from Crate and Barrel:

(Non Traditional) Sushi Accessories
Clockwise from top: Rectangular Dish, Square Dipping Bowls, and Deep Sauce Dish
 

I have the small white ones, which we bought for this purpose... but I actually end up using them more than I expected whenever I need a small dish (they're great for holding olive oil you need to brush onto dough, etc). In general, I tend to buy all white so I can change my accessories and color theme easily, but love those colored ones too! I also got a couple of the longer dishes for putting out wasabi and ginger for the table to share.


Picture via Amy Atlas


Of course, no party would be complete without some craftiness! No need for fancy chopsticks, but replace the paper wrapper with something pretty... how gorgeous are these ones from Amy Atlas?! (Created by Twig and Thistle). Follow the link for instructions, or use this alternate version from Zakka Life.


For decor, I love the idea of making some paper cranes (you can find instructions here), a Japanese symbol of long life, prosperity and good health. It would be adorable to leave one at each place setting, or make a bunch, string them up, and hang from the ceiling over the table... Here are some great instructions for stringing cranes from a bride who made 1000 for her wedding(!).

Strings of Hanging Cranes
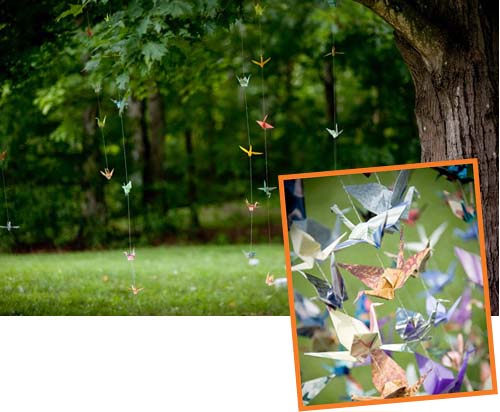
Top: Cheap Wedding Planning,
Bottom:
Woodward + Rick Photographers via Wedding Paper Divas and Green Wedding Shoes


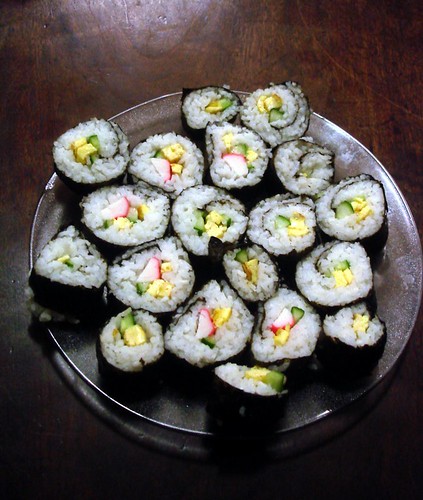
Hope you're inspired to have your own sushi party... if you do, I'd love to see pictures!

Monday, October 4, 2010

Supper Club: Roll Your Own Sushi


Photo from Frenkieb (Flickr)

You have our friends Chris & Maura to thank for this idea... they had a Sushi Making Party for one of our Supper Club get-togethers and it was so much fun! Rolling sushi is one of those things I had heard people do at home, but I had never tried it before... but is was so much easier than I expected and was a fun hands-on party. Everyone made rolls and then we put them on a big platter in the middle of the table and were able to enjoy one another's creations - yum!

Supplies/ Ingredients:
* Sushi Rolling Mat: we only had 2 for 6 people and were fine to share... I've seen instructions online for rolling without mats (use fabric & put saran wrap over it to prevent sticking), but the mats made it feel so much more authentic and were fun to use
* Nori: seaweed sheets
* Sushi Rice: its important that you use rice labeled to be for sushi, so that it is sticky enough for the job. Traditionally, the rice is made with vinegar (here's a recipe from Better Homes & Gardens)
* Fillings for your sushi... our friends went to a local fish market and were given advice on what seafood to use. Don't forget the veggies too! I don't eat seafood, but love avocado, cucumber, asparagus and carrots in my sushi rolls.
* A bowl of water near where you'll be making the rolls
* Soy sauce and wasabi (Japanese horseradish) for dipping
* Optional: toasted sesame seeds and fish eggs (for the outside of your inside-out rolls), tempura crispies (look at a local Asian market)

Instructions:
1. Make sure your sushi mat is clean (you'll want to rinse it off between making rolls) & then place a piece of nori on it, shiny-side down
2. Put 1/2-2/3 cup of rice on the nori and spread it around very thin. You can use your hands or a flat wooden spoon, but use the bowl of water to keep your hands wet to prevent the rice from sticking. Be sure to leave about 1/2 an inch at the top empty and free of rice
Sushi from above
Picture from futureshape (Flickr)

3. Place your desired fillings across the mat, about 1/3 up from the bottom edge. You can even have your fillings stick out the ends for a fancy effect once cut. :)
4.Using the rolling mat, begin to tightly roll the sushi. Start at the side nearest to you, and roll away from you. Make sure you don’t roll the rolling mat into your sushi... as you get the mat to the point where it would be rolled into the rice, roll it backwards upon itself. See this video for an example, its much easier to see it done than explain it in words! The most important thing is that you roll the sushi tightly - keep a lot of pressure on your mat and sushi as you roll to ensure a tight roll that will be easier to cut and eat.
Homemade "Sushi"5. Before you get to the end (where you left the nori uncovered by rice), use your fingers to put some water on that exposed edge - this will help the edge of the nori to stick to itself when rolled. When the sushi is completely rolled, use the rolling mat to give the sushi a final squeeze so it does not unroll when you are trying to cut it.
6.Cut your roll into pieces, depending on how thick you like your sushi. If you're having trouble with the rice sticking to the knife, it can also help to wet your knife between cuts.
7. Enjoy your creation!
If you want an inside-out roll (where the rice is on the outside), just flip the nori over between steps 2 & 3. You can then put some sesame seeds on the rice after rolling.

Still want more instructions and examples? I liked these tutorials:

Friday, October 1, 2010

A Spark of Creativity

Remember when I said that I loved the idea of an oversized focal point? Well, below is a sneak peek of a project I've been working on & will share with you next week:

Sparkler

Hope you have a wonderful weekend!